How to Draw a Lion – An Easy Step-by-Step Guide for Kids
Today we are going to sketch King of the Jungle! Yes, lets draw Lion for kids. Lions inhabit a variety of environments, although they are most active at night in grasslands, savannas, thick scrub, and open woodlands. Making a sketch every day is a good way to help your child develop their creative skills.
The lion is a very powerful animal due to its magnificent appearance and exceptional hunting abilities. A free lion drawing instruction is in high demand due to people’s obsession with lions. Here we have 7 easy Step-by-Step Guideline for How to Draw a Lion.
Lets get Started Guideline for How to Draw a Lion
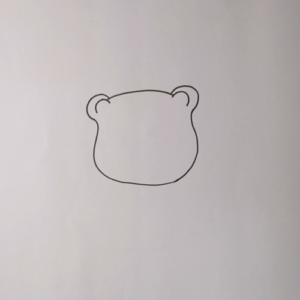
Step 1: Initiate by drawing the pair of Ears of the Lion
Here we have simple and easy guidelines for How to Draw a Lion. Lets get started!
Draw an Inverted U-shaped figure for inner ear. This creates the appearance of the Lion’s inside ears. Once that’s done, draw a line across the top to finish the figure.
The lion’s left and right ears are created as shown. When sketching lion’s ears, keep in mind that they are usually rounded and stand upright.

Step 2: Draw Outline for Lion’s Face
Start from the inner ear, draw outer ear and constitute by U-shape, with the middle part slightly wider.
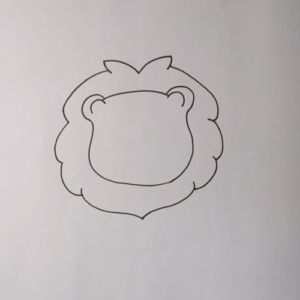
Step 3: Create Lion’s Mane
Draw the lion’s mane surrounding the Lion’s Face that was drawn sideways in the previous step. Remember to add hair clumps to give texture and give the impression that the mane is fuzzy and silky, just how it should be!
Following completion of the steps, the lion’s mane and head outline should to be visible.
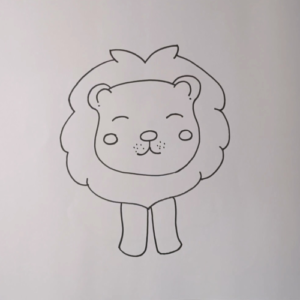
Step 4: Next, Sketch Cute Facial Expression
In the following section of this lion drawing tutorial, we’ll approach the adorable expression on this painting. The blank area on the face quickly made us think of possibilities before we even did!
It would look fantastic if you added some of your own facial designs, but the one you are planning to add looks excellent, too. Making many variations of the picture might be a good idea to explore the various options available.

Step 5: Draw the Front Legs
Draw two side-by-side legs, just underneath the lion’s head. All you need for creating the leg is to two parallel vertical lines.
Step 6: Draw the Back Legs
Next step on our guidelines for How to Draw a Lion , you should sketch the back legs of the Lion. Your Lion should be appeared in sitting position. So draw according to the reference image.

Step 7: Colors to Bring the Lion to Life!
The lion is now completely finished, as the picture shows. Now all you needs is a pop of color. Now for the most exciting part coloring your drawing grab your favorite coloring supplies and get started!
As shown in the below example, we use a yellowish brown color for the lion’s coat and a darker brown color for the mane. In either case, we have no doubt that the colors will look stunning!
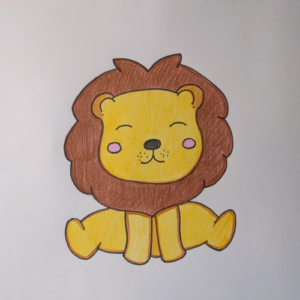
A lion’s mane can be any color from blond dark brown to black, although its looks usually yellow-gold in color.
Hurray! You have successfully completed your cute little Lion. By following our guidelines for How to Draw a Lion.
For more enjoyable drawing tutorials similar to this one, feel free to browse our “How to Draw a Lion” collection! Do watch this video tutorial.
You should be happy of yourself for completing a masterpiece, finishing a detailed lion drawing is an achievement! When you’re done, ensure to snap a picture of your artwork!
You can visit our YouTube Channel for more video tutorials. The link is here :
https://www.youtube.com/@ohparrot1121/videos
