
Hi, young artists!
In today’s lesson, we’ll learn how to draw Lotus Flower step by step. Lotus flowers are soft and elegant and full of many delicate petals, making it an excellent object for a nature drawing. In this tutorial, we’ll create a blooming pink lotus flower with a green stem, a lily pad, and even a tiny dragonfly adding a fairy touch.
And here’s the most interesting thing, this Lotus Drawing uses very easy-to-understand petal forms, which means that children or beginners won’t find it hard to complete this drawing. We’ll start from the middle petal, add more layers, and make our flower colorful and detailed.
For our Beautiful Lotus Drawing for Kids, I used a Sharpie marker and acrylic markers. You can use the same art tools as I did, but if you don’t, you can take your crayons, sketch pens, or colored pencils, and this drawing will be amazing anyway.
Let’s begin this exciting Lotus Drawing lesson.
Materials needed
Sharpie Marker
Acrylic Markers
Drawing Paper
Crayons, colored pencils, marker pens, or any other coloring medium that you may have at home can also be used.
Lotus Fun Fact 🌸
Do you know that:
The lotus flower blossoms in the mud, but the flower remains pure and beautiful when it blossoms out of the water. This is the reason why many people consider the lotus to be a unique flower.
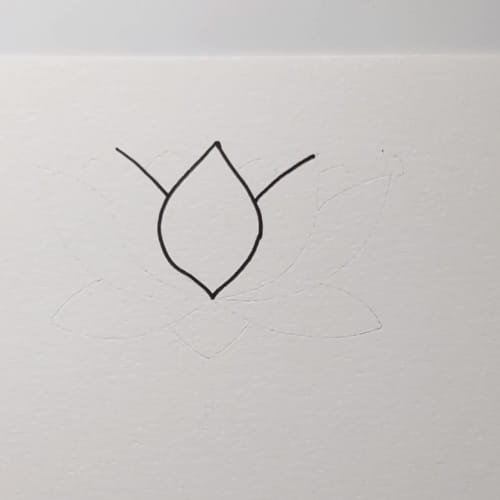

Step 1: Begin Your Lotus Drawing from the Central Petal
To start the Lotus Drawing process, you need to draw one petal in the middle of your picture. It should have an upward-pointing peak and curves on each side. This will be your central flower petal facing forward.
Be careful when doing this since it is the central part of the flower. Once this petal is neatly drawn, everything else in your lotus will become easier to draw.
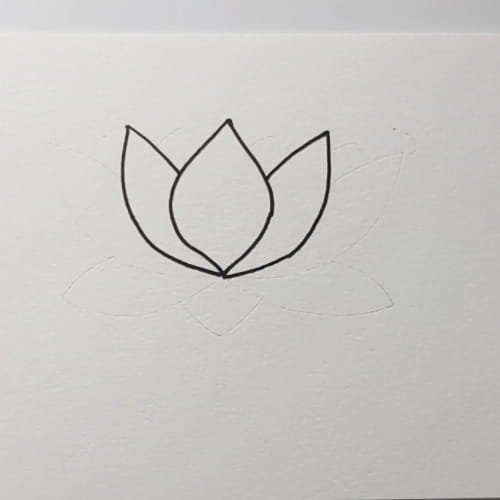
Step 2: Draw Petals on Sides of Lotus Drawing
In this step, draw one petal on the left side of your central petal and another one on the right. These two petals should slightly curve outwards, as if the flower is blossoming.
At this point, your drawing will start looking like a blooming flower. Make sure to maintain symmetry between the two petals for aesthetics sake.
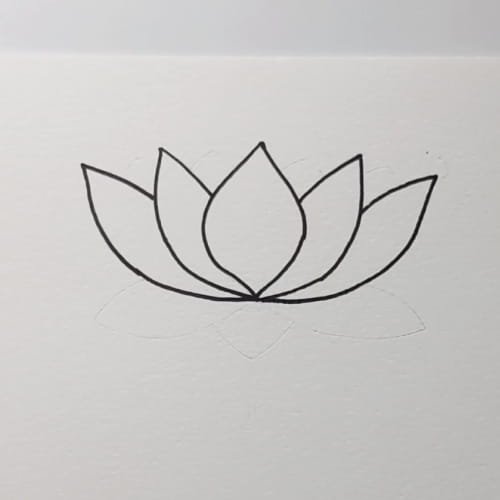
Step 3: Drawing of the Outer Petals in the Lotus Drawing
Draw the next two petals located on the very left and the very right sides. The petals go behind the side petals, making the flower fuller.
The step is crucial since the flower consists of many petals that have different layers. As a result of adding the outer petals, your Lotus Drawing gets an elegant appearance.
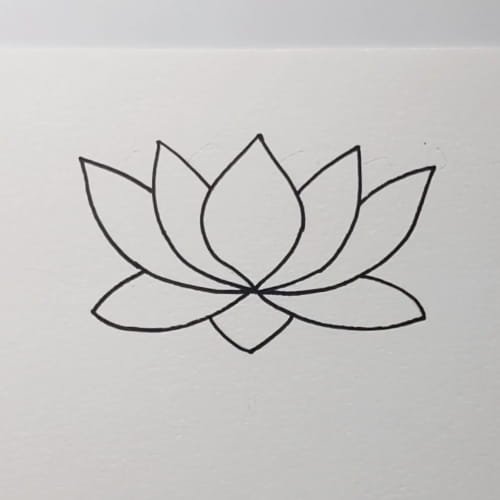
Step 4: Drawing the Bottom Petals for Your Lotus Drawing
Now draw the bottom petals located under the flower. You need to draw one petal in the middle and one on each side.
This step will give the wide blossom to your drawing of a lotus flower. In addition, the flower will get a natural look.
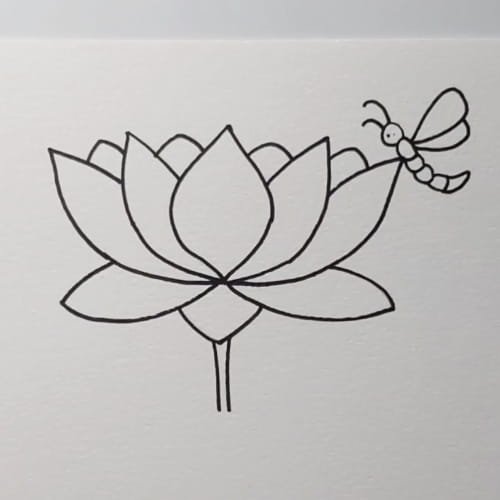
Step 5: Add the Back Petals, Stem, and Dragonfly to Your Lotus Drawing
Add a couple of small rounded back petals appearing behind the front petals. Now add a straight stem emerging from the flower’s center. Finally, put a tiny dragonfly near the flower.
It will make your Lotus Drawing very pretty indeed. The back petals will give more depth, whereas the stem and dragonfly will make the flower into a little natural scene.
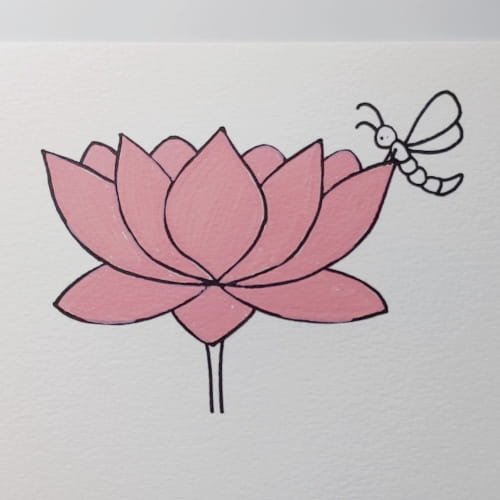
Step 6: Paint Your Lotus Drawing
Take the soft pink marker and begin painting the petals. First, color the front petals and only then the back ones using the same pink marker.
Once you have painted the flower, it will become bright and cute. But pink is not the only color you can use when coloring the flower – light purple or peach will do just fine!
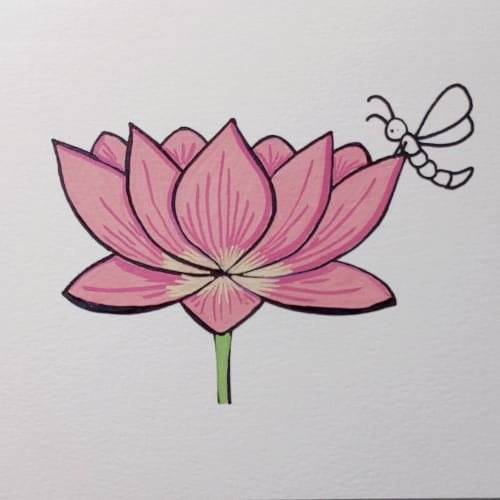
Step 7: Draw Lines on the Petals in the Lotus Drawing
At this point, draw the lines on the petals using the slightly darker shade of pink color or fine marker. Start drawing lines from the bottom edge to the top part of each petal. Also, you may apply light yellow or cream color in the central part of the flower.
These little details make a huge difference because they will make the Lotus Drawing look elegant and delicate.
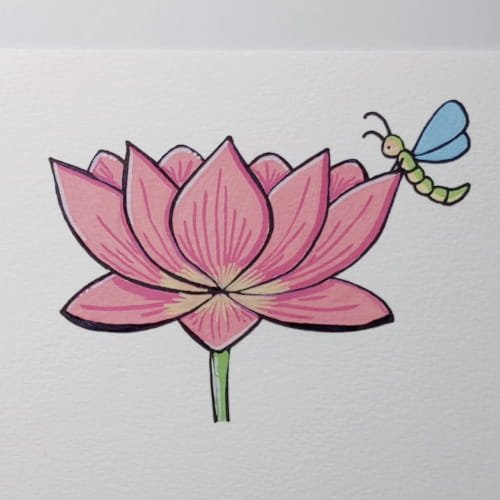
Step 8: Color the Dragonfly and Stem in the Lotus Drawing
The next step is to paint the stem green. Then, you should paint the dragonfly using soft shades of blue, green, or yellow colors. A tiny colorful dragonfly will be a great addition to the overall picture.
With this step, we will make the picture look more diverse.
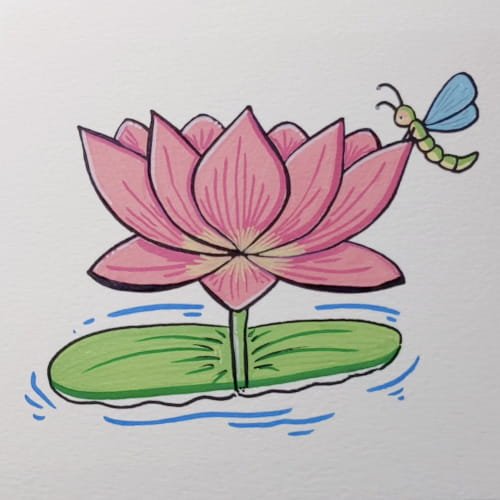
Step 9: Complete Lotus Flower Drawing with Lily Pad and Water Ripple
Draw a big green lily pad near the base of the flower. Use light green and dark green to color the petals. Also, add some blue curved lines surrounding it in order to create water ripples.
Your lotus flower now looks like it is growing peacefully in the pond. It completes the whole picture and makes it look harmonious, tranquil, and lovely.
Why Children Like Lotus Drawing Activities
Lotus Drawing is such an interesting drawing activity that can be repeated many times since it is composed of repetitive petal images. As soon as you know how to draw one petal, it becomes much easier to draw other parts.
It is also a peaceful drawing activity as all the flowers are associated with tranquility and beauty. The lily pad, dragonfly, and water ripples will definitely make the picture more interesting.
Conclusion
We hope you have fun making this Beautiful Lotus Drawing for Kids. You have learned how to use simple petal shapes to make a nice drawing of a flower, a stem, lily pad, and a dragonfly.
Practice your lotus drawing skills by adding more details such as color, more petals, and additional pond features around the lotus. The more you practice, the better you get at it.
If you liked Lotus drawing lesson, don’t stop here! We have lots more simple drawing lessons for kids for you. Check out : Easy Mountain Drawing for Kids Blog if you are a beginner or new here.
Watch More Kids’ Drawing and Coloring Videos on YouTube
Check out our YouTube channel for more easy-to-follow drawing and coloring tutorials for kids : https://www.youtube.com/@ohparrot1121/videos
Want to see more drawing ideas, colorful art, and creative updates? Follow our Instagram page:
Instagram: https://www.instagram.com/ohparrot/
Have fun drawing!