Hello little artists!
In this tutorial, we are going to learn to create a beautiful Camel Drawing with the help of simple lines, shapes, and colors. The camels are fascinating creatures living in the desert areas who are famous for their long necks, powerful legs, and humps on their backs. These camels are often nicknamed the “ship of the desert” as they can survive long periods in harsh conditions.
Camel Drawing that we are going to make today is an excellent choice for all beginners as it will be created bit by bit. We will start our drawing from the face of the animal, then proceed with the neck, body, legs, hump, and lastly, details.
I have created my Camel Drawing using a Sharpie marker for the outline and acrylic markers for coloring. But don’t worry, if you haven’t got these materials at hand, you can still try creating a Camel Drawing using crayons, sketch pens, colored pencils, or any other material that you might already have.
So, let’s get started!
Things You Will Need
Sharpie pen
Acrylic paints
Drawing paper
You can even use crayons, sketch pens, or color pencils.
Fun Camel Trivia 🐪
Did you know that?
A camel is capable of surviving for many days without having water. This is because its body is designed in such a way that it can survive in the harsh desert climate.
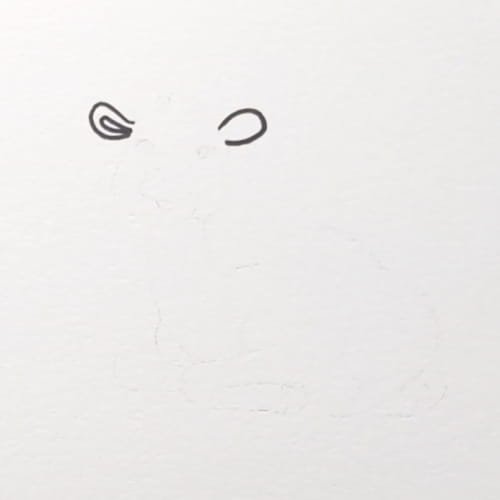
Step 1: Begin Your Camel Drawing with the Face and Back
Let’s start the Camel Drawing by creating the face of our camel first. Draw a rounded face shape on the left side of the page. After that, create a long curved line from the back of the head to the right side for drawing the back of the camel.
As we see, in this step, we give our camel a certain pose and direction. Though it looks absolutely simple at this moment, it already shows us where the body of the camel can be located. Keep in mind that the head of the animal needs to be rounded and soft since this camel is very friendly.
Step 2: Draw the Camel’s Body Shape
Now create the bottom line under the back arch. You should connect these two lines in such a manner that it will form the body of the animal. Remember that the body of the animal should have a soft rounded shape rather than a stiff line. Now create the bottom line under the belly region, so that the camel can take the sitting position.
This step is vital as it completes the basic body shape of the camel from the initial curved line. It makes A Camel Drawing very easy when you think of the body of the animal as one complete soft shape initially.
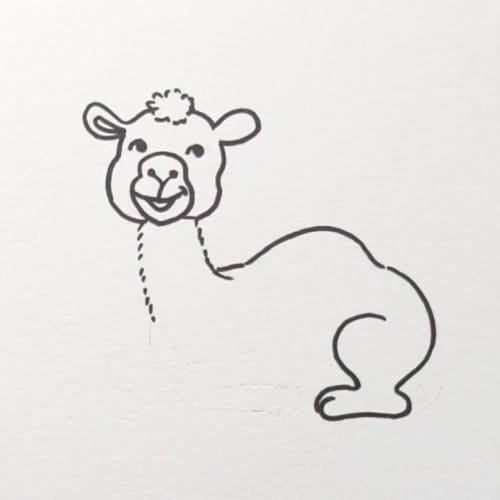
Step 3: Create the Legs of the Animal in a Camel Drawing
The next step is to add the legs of the camel in the drawing. Since this is a sitting camel, the legs of the animal should be folded and placed under the body of the animal. Create the front legs first and then create the rear legs of the animal.
Do not try to make these parts very perfect; just keep the shapes simple and round. In a cute Camel Drawing, the legs do not have to be detailed in any way. Round lines will do fine as they add softness and give the impression of a calm animal.
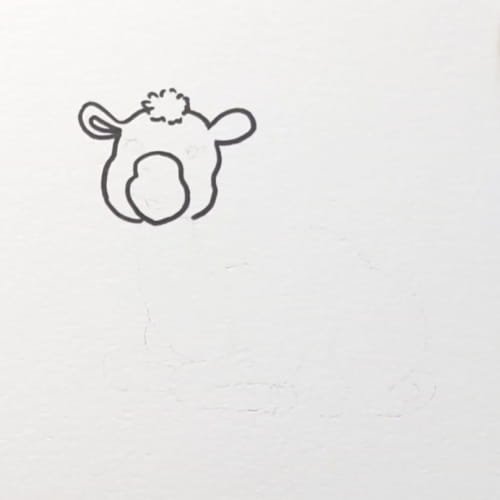
Step 4: Finish Off the Camel Drawing With the Hump and Tail
It is now time to finish off the drawing. First, draw the hump on the camel’s back, if it has not been drawn completely yet. Then, draw the small tail at the hind leg. Finally, fill out the body lines to get the complete camel shape.
By now, you should see a camel in your Camel Drawing. The hump is one of the most important features as it immediately gives the impression of a camel.
Step 5: Draw the Details of the Face for the Camel Drawing
Now it is time to add the nose, mouth, and eyes of the camel. Don’t forget to draw the ears as well as the fluff on top of the camel’s head. You can draw the fluff of the hump in the same step if you have included that part into your outline.
This is one of the most exciting steps in the Camel Drawing process since it gives your camel a character. The smallest hint of a smile and a pair of kind eyes with some fluffy hair will give you a very cute and happy camel.
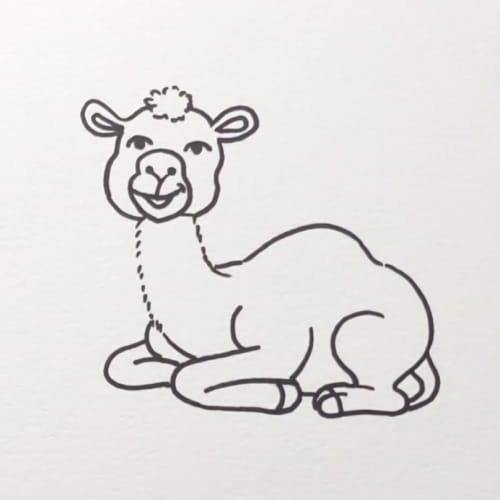
Step 6: Draw the Full Camel Outline
Check your camel once again and make sure everything looks great together. Darken the outline and smooth out any rough spots around legs, body, head, or hump.
This is your final outline drawing of the Camel. Stop for a moment and take a look at the whole drawing before moving forward to coloring.
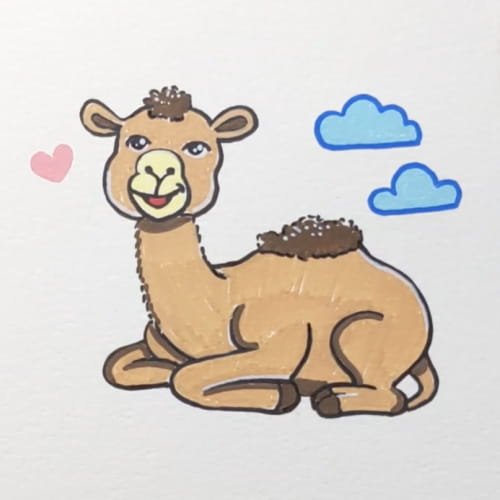
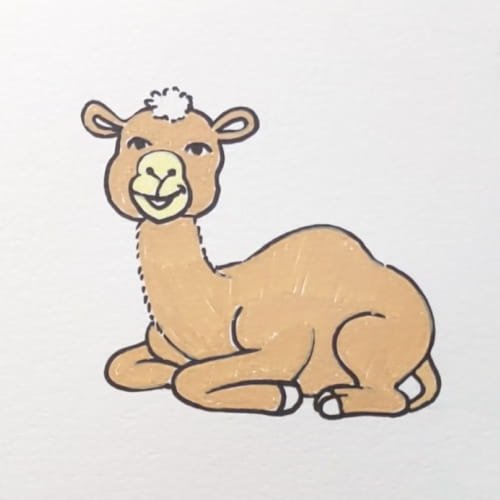
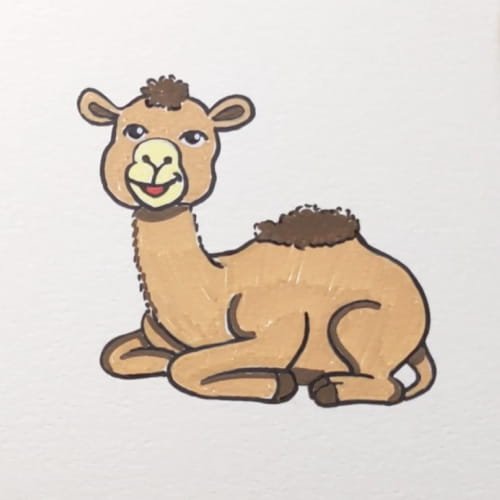
Step 7: Add Colors To Your Camel Drawing
It is time to make your drawing colorful now. Color the body of the camel using a light shade of sand or beige. The hair and hump on the back of the camel can be colored in dark brown. For the nose, you can use a creamy or yellowish color and add red or pink inside its mouth.
If you wish, you may draw a blue cloud or even a heart on the background in order to match the last picture in this series.
Why Kids Love Camel Drawing
Camel Drawing is fun since it has a very unique silhouette. This animal has a long neck, round face, hump, and folded legs. It stands out against most other animals drawn by kids. In addition, it provides children with an opportunity to study desert animals while creating a cute object.
Moreover, this type of drawing is perfect for practice as it combines big shapes of the body with small ones such as the face, ears, and hump. Thus, children will learn how to create a drawing gradually and become confident.
Conclusion
We hope you enjoyed creating this Cute Camel Drawing for Kids. Using the head and body as a start point and adding legs, hump, face, and colors, you created a very charming camel in an easy way.
Continue improving your Camel Drawing skills and make it more interesting by adding sand dunes, a sunny sky, or desert background to your camel drawing. Small additional elements will create a whole scene for you.
If you liked our Cute Camel Drawing for Kids lesson, don’t stop here! We have lots more simple drawing lessons for kids for you. Check out : Cute Sea Turtle Drawing for Kids Blog if you are a beginner or new here.
Watch More Kids’ Drawing and Coloring Videos on YouTube
Check out our YouTube channel for more easy-to-follow drawing and coloring tutorials for kids : https://www.youtube.com/@ohparrot1121/videos
Frequently Asked Questions
How can one create an easy Camel Drawing for kids?
First, draw the head and the back of the camel. Then draw its body, legs, hump, and facial features to make a Camel Drawing easy for kids.
Is it easy for a beginner to make this Camel Drawing?
Sure. It will be easier for beginners because this Camel Drawing for Kids is simple and made of calm poses.
What colors can one use for making a Camel Drawing?
For realistic purposes, you may use light brown, beige, cream, and dark brown. You may also use some background colors like blue and pink.
How do I add creativity to my Camel Drawing?
You may add sand dunes, sun of the desert, cacti, clouds, and even a tiny heart around your Camel Drawing to give it a playful feel.
Why is Camel Drawing good for children?
Camel Drawing will help the child practice drawing curves, animals, coloring, and observing things. It will also make them learn about the desert animals in a fun manner.
Can I use crayons in the process of Camel Drawing?
Yes. Crayons, color pencils, sketch pens, acrylic markers, and markers can all be used for the process of Camel Drawing.
Which is the easiest way to draw a camel?
It is easier to first draw the head and body part of the camel and then add legs and hump to it. This makes the process of drawing the Camel Drawing quite easy.